
If you are going to be selling your art as prints or already have been doing so, are you also offering Certificates of Authenticity (COA) to your buyers?
This is a topic that comes up quite often when we visit with artists and photographers over the phone or even in person. Two questions are asked. The first is how I have those made and what goes on them.
Ways to Make Your Certificates of Authenticity
We have seen all manners of COAs, from simple and basic signed copy paper with some information about the print to more elaborate ones printed on fine art papers normally used for the prints themselves.
If you want to make your own, come up with a design that you think will work for you. It is then just a matter of designing it in something like MS Word or another word processor and printing it out on certificate paper, which you can purchase at any office supply store. And if office certificate paper is not going to work for you, I have seen a number of COAs that simply use plain paper with official letterhead of the artist or their gallery (if they have one).
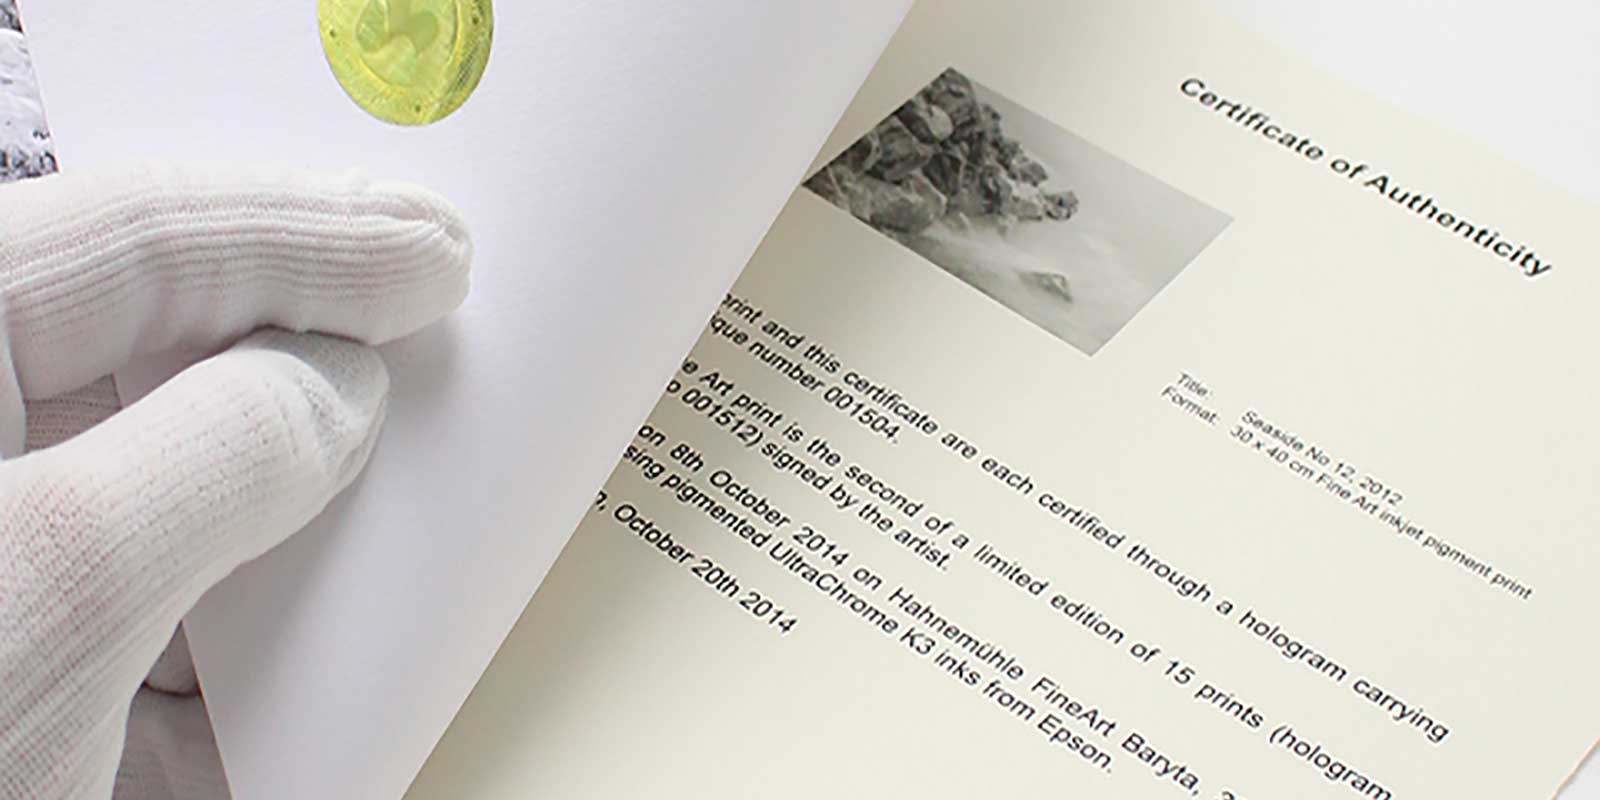
For a more high-end approach, one option you might want to look at is FinerWorks’ COA kits that can be ordered in singles or by the box (25). We have extensive instructions and even a template example that you can use. This will help you not only come up with an elegant COA for your prints but also provide a means to register them. To learn more and order these kits, visit the FinerWorks COA Kit Page.
As an example of how these kits work, check out the video below.
Things to List on a Certificate of Authenticity for Prints
Artists, photographers, and even print-makers vary extensively in what they list on the certificate, therefore leading to different expectations by artists. Based on the fact that there is a wide variation, I am going to present you with a list of the common fields of data I have seen listed. By all means, try not to list all, but only a handful that you think are the most important to you. If you are working with a gallery, and they require you to come up with your own, of course, find out from them what they will require.
Certificate of Authenticity (COA) Fields
Print ID Number
A unique identifier printed on the COA. Some publishers use a SKU, serial number, or internal reference number to identify a specific print.
Title
The title of the print or the original artwork the print represents.
Artist First Name or Initial
The artist’s first name or initial.
Artist Middle Name or Initial
The artist’s middle name or initial, if applicable.
Artist Last Name
The artist’s last name.
Sheet Size
Sometimes referred to as paper size. This is the overall physical size of the print, including any handling margins. For mounted or canvas prints, this includes the visible face as well as any wrapped edges.
Printed Image Size
The dimensions of the actual image printed on the sheet, excluding margins.
Edition Name
Used when identifying a specific edition (for example, “Limited Edition” or “Artist’s Edition”). For open or single editions, this may be labeled as Open Edition or Single Edition. If the print is signed, it is recommended to note that here.
Total Number in Edition
The total quantity of prints produced for this edition. For example, if 24 prints are made, the total edition size is 24. A print marked 21 of 24 indicates it is the 21st print in that series.
Assigned Number
The specific number assigned to this print within the edition (for example, 21). If no numbering applies, the print should be designated as an open or single edition.
Number of Proofs
The number of artist proofs produced. While proofs are not required, creating at least one artist proof is recommended so the artist can review the final output before prints are distributed.
Print Method
The technique used to produce the print, such as giclée, lithograph, or serigraph. If the print is a giclée, it can be helpful to specify the printer type as well.
Substrate Type
The material the print is produced on, such as paper, canvas, or linen. Whenever possible, include the specific paper or canvas name rather than a general category.
Ink Type
The type of ink used in production. Detailed information is encouraged, such as the brand or formulation (for example, pigmented inks like Epson UltraChrome or HP UV Pigmented inks).
Finish Type
Any coating or finish applied to the print, such as an aqueous coating, liquid laminate, or lacquer finish. If the artist applies their own finish, that should be noted here.
Original Media
The medium of the original artwork being reproduced. Examples include Oil on Panel, Watercolor on Paper, or Digital Photograph.
Notes
Optional brief remarks (one or two sentences). Photographers may include technical details such as lens or exposure settings, while artists may note inspiration or context for the work.
Date of Birth
The date the print was produced. This information is typically provided by the print maker.
Date of Death
The date the print was destroyed or removed from circulation, if applicable.
Additional Information
Optional fields that may be useful depending on the artist’s needs or the nature of the work.
- Registration Date
- Registration Void Date
- Owner Name
- Owner State
- Owner Country
Again, all these fields are optional. Obviously, if you tried to fit in all the fields, you may have a certificate that is cluttered, so use some common sense to determine what you think needs to be included. Print the certificate on nice certificate paper and don’t forget to sign and date it.